2 Introduction
In this first week we will cover the introduction to Python, why is it important, the software components required to have a simple python environment to work with this programming language, relevant and basic concepts as well the description of the workflow of version control. In this week we have lof of work and concepts to work on, but luckily this will stablish all the concepts and components we need for the rest of the course.
2.1 Slides
Click here to open the slides in a separate tab Week 1 - Slides
2.2 Installing and setting up your Python environment
Perhaps the first exercise that helps you get a sense of what is like of working with Python is setting up your first Python Environment - PyEnv. A PyEnv is an independent space where you install all the packages, python version and software components you would need to write and run your scripts. Although is not a compulsory activity, it is recommended to do it before you jump to write and deploy python scripts. It is also relevant that you feel comfortable working with the Terminal or Command-Prompt in your operating system, whether it is a Windows, Mac, or Linux computer.
Technically you could manually install every single library we need. However, we will use a predefined Python environment file that includes all the packages and the Python interpreter we will need for this course. The reason for doing this, is because installing Python libraries and its dependencies can get very tricky and confusing, depending on the operating system, the version, the path where we install, the type of users, even the package manager that suppose to help us can actually be a source of confusion. So, the best way and certainly the most secure way is using a unified single environment file and a package manager to create our Python Environment - PyEnv.
2.2.1 Virtual Python Environments:
Virtual environment in python is a programming environment which works in a way that the Python interpreter, libraries, and scripts installed into it are isolated from the ones installed in other virtual environments (or used by the operating system, important in macOS). This ensures that all the installed packages work nicely together. You can create multiple environments on your computer for different projects (having e.g., different versions of Python and specific libraries), and you can swap easily between environments by activating them from the command prompt with a single command. There will be instructions to doing that in the following sections.
2.3 Python Package Manager – Mini-Conda :
![]()
Let’s start with the package manager, we will use Conda, more specifically Mini-Conda (a lighter version of Conda), which is a package, dependency and environment management for any language including Python. It is an open-source component, and can be installed on Windows, macOS, and Linux. With MiniConda you could quickly installs, runs, and updates packages and their dependencies. Mini-Conda easily creates, saves, loads, and switches between environments on your local computer.
For MacOS users, please be aware that macOS already includes an old version of Python, so it is needed to install an updated version of Python that works with the other packages and dependencies that we need for this course.
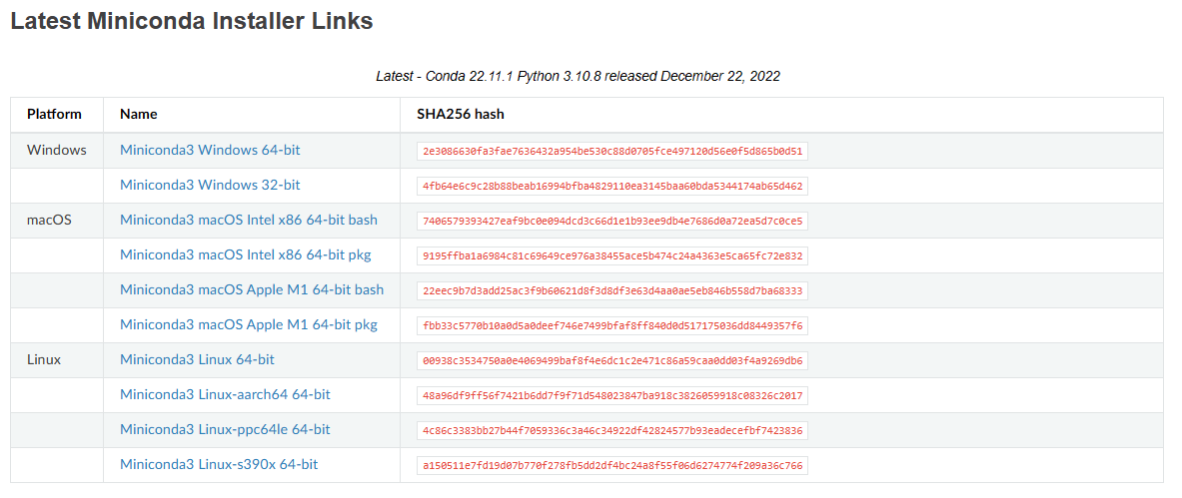
Got to: https://docs.conda.io/en/latest/miniconda.html and get the installer based on your operating system.
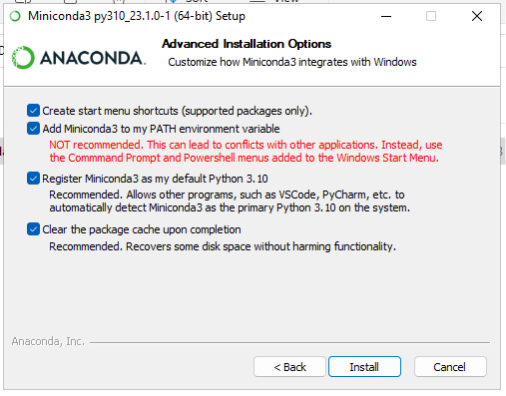
Once you have downloaded the installer, double click on the installer file to install it. In general, you could follow the default options, but for this course, make sure you pick the following:
Select “Just Me” during the installation, and MiniConda will only be available for the current user. This will not require any administrator rights for the installation.

Make sure you pick all the advanced installation options.
After the installation is complete, you can validate that python and MiniConda were installed appropriately by running the following commands in your terminal or command prompt.
Open the Anaconda Prompt (miniconda3) or Terminal for macOS, from the Start menu (Apps) and run the command conda ––version, it should return something like.
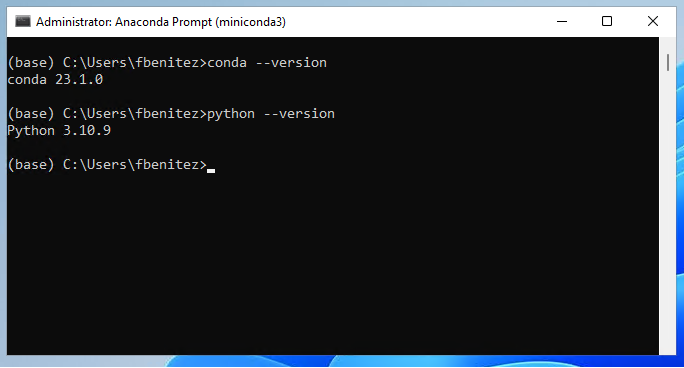
You might have noticed that I also ran the command python ––version this one is to validate the python version you have in your system (e.g., 3.10.9)
If you have any problems with the Miniconda installation, you can find some installation tips on the Miniconda website.
2.4 Installing a python package manager – Mamba
Ok, now your computer has MiniConda installed; the next step is installing a python package manager. We will use the python package manager called Mamba to handle the installation of python packages in Miniconda. This is particularly important as mamba will help us ensure everything we install or remove is consistent. This can be very tedious work, so Mamba is a very convenient tool for the consistency of our virtual environments. Having a python package manager is not always a requirement when you set your virtual environment but will make your life easier when you start to create multiple environments.
Open a terminal window or command prompt in Windows (as an admin user) and run the following command:
conda install mamba -n base -c conda-forgeIf you get a message asking you to confirm the installation of new packages type yes and Enter